It’s a connected world, and the day may come when your programs need to communicate with users who speak different languages and format times, dates, and currency values differently. This is where Internationalization comes in.
Let’s start by internationalizing a program by providing for different languages. Download project Lesson-24-Exercise-01, import it to your workspace, and follow along.
package org.hardknockjava.lesson24.exercise01;

public class Wilkommen {
    private static final String WELCOME_ENGLISH = "Welcome";
    private static final String STRANGER_ENGLISH = "Stranger";
    private static final String HAPPY_TO_SEE_YOU_ENGLISH = "Happy to see you";
    private static final String STAY_ENGLISH = "Stay";
    private static final String TO_CABARET = "To Cabaret";

    public static void main(String[] args) {
        printPhrase(WELCOME_ENGLISH);
        printPhrase(STRANGER_ENGLISH);
        printPhrase(HAPPY_TO_SEE_YOU_ENGLISH);
        printPhrase(STAY_ENGLISH);
        printPhrase(TO_CABARET);
    }

    private static void printPhrase(String phrase) {
        System.out.println(phrase);
    }
}
As you can see, our program displays five messages in English. Suppose we want to be able to display them in German or French as well. Eclipse has some tools to help.
The Internationalization Wizard
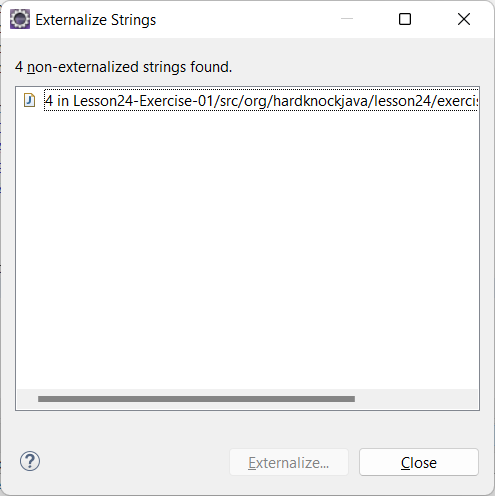
To get started, in the Package Explorer, select the classes and/or packages you’d like to have internationalized. Then select Source/Externalize Strings… from the main menu. If you’ve selected one or more packages, or multiple classes, you’ll see a wizard that looks like this:

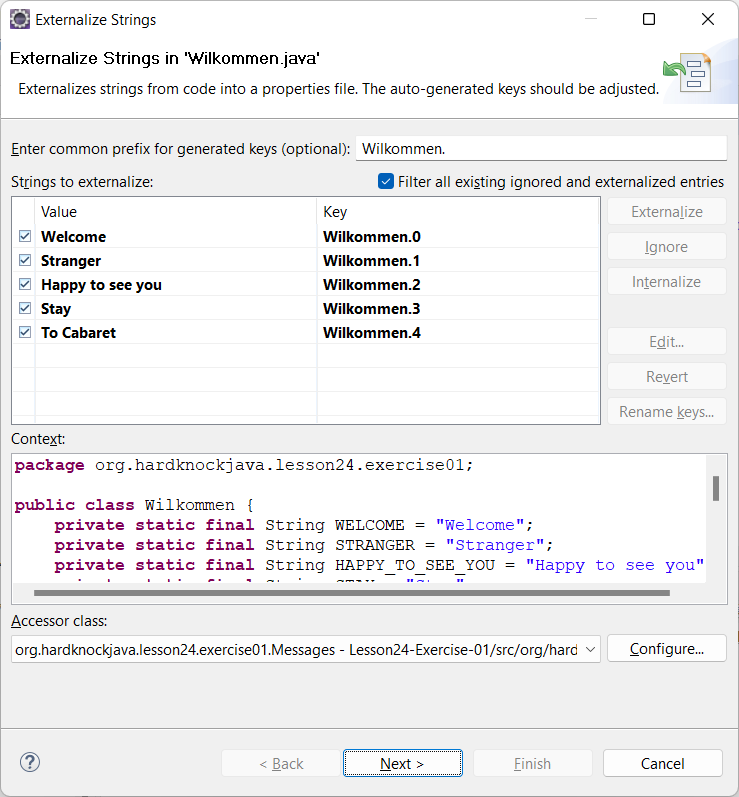
… in which case you select one or more of the listed classes and click Externalize…. Once you’ve done that, or if you selected only one class, you’ll see something like this:

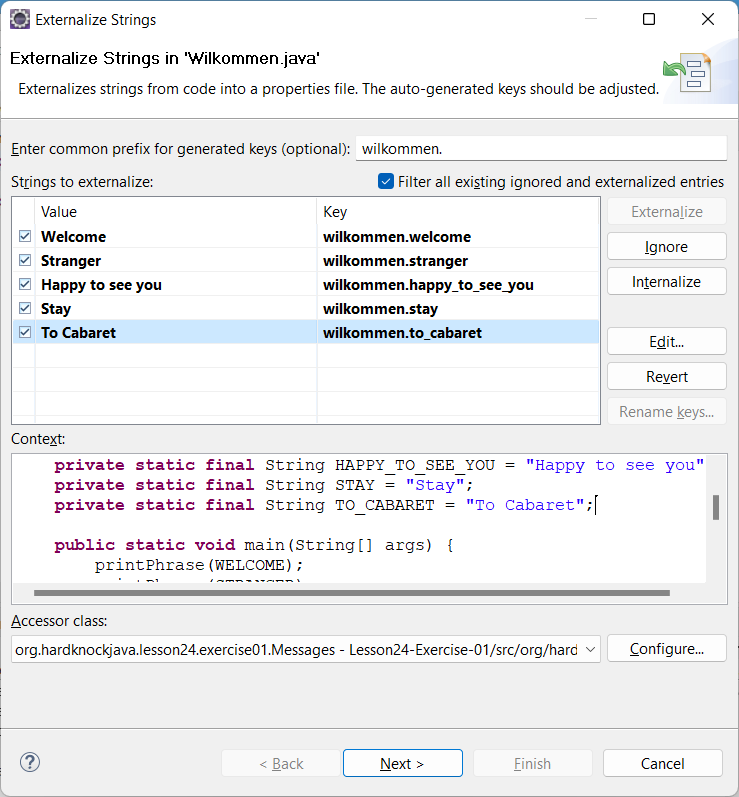
Here we can configure what the wizard will create. We’ll start by changing the names of the keys by which we’ll identify the text strings by simply replacing them in the grid.
We’ve also changed the common prefix at the top of the window to lowercase.

At the bottom of the window is information about the Accessor class the wizard will generate. We can change where and how the class will be configured by clicking on Configure and making the desired changes.
For now, we’ll leave things as they are.
Click on Next and, if there are any problems, a window appears notifying you of such. In this case, the only problem is that the properties file to be created doesn’t yet exist.
The next window is a preview of changes. You can uncheck any of the boxes you like in the “Changes to be performed” window. Click on Finish and the wizard does its work. Try running the resulting code and here’s what you get.
Welcome
Stranger
Happy to see you
Stay
To Cabaret
So what’s changed?
Primarily, each of the constants in class Wilkommen was changed to look like this:
private static String WELCOME = Messages.getString("wilkommen.welcome"); //$NON-NLS-1$Each is a call to Messages.getString(). So let’s examine class Messsages.
package org.hardknockjava.lesson24.exercise01;

import java.util.MissingResourceException;
import java.util.ResourceBundle;

public class Messages {
    private static final String BUNDLE_NAME = Messages.class.getPackageName() + ".messages";

    private static final ResourceBundle RESOURCE_BUNDLE = ResourceBundle.getBundle(BUNDLE_NAME);

    private Messages() {
    }

    public static String getString(String key) {
        try {
            return RESOURCE_BUNDLE.getString(key);
        } catch (MissingResourceException e) {
            return '!' + key + '!';
        }
    }
}
The generated code establishes BUNDLE_NAME as the base name of our ResourceBundle. ResourceBundle is an abstract class that facilitates internationalization. In this example, the ResourceBundle is of the concrete class PropertyResourceBundle.
Despite the “bundle” in its name, it applies to a single object: the file org\hardknockjava\lesson24\exercise01\messages.properties. The getBundle() method presumes that the file name ends in the “.properties” extension, and that the file is on the execution classpath. (Eclipse’s default launch configuration includes the project directory on the classpath, but not any subdirectories–so the wizard is filling in the rest by qualifying with the package name.) BUNDLE_NAME is everything up to the extension, which the getBundle() method supplies.
So when class Wilkommen calls getString() in Messages with a particular key, the ResourceBundle looks up and returns the corresponding String from message.properties:
wilkommen.happy_to_see_you=Happy to see you
wilkommen.stay=Stay
wilkommen.stranger=Stranger
wilkommen.to_cabaret=To Cabaret
wilkommen.welcome=Welcome
File messages.properties
So far, so good. Except: there’s no internationalization.
So let’s add some.
First, let’s add properties files for German and French in the same directory as messages.properties. We’ll call the first messages_de_DE.properties (“de” for “Deutsch”) and the second messages_fr_FR.properties.
In the Messages class, we’ll replace RESOURCE_BUNDLE with a Map of Locales to ResourceBundles, and add code in the constructor to initialize it from an array of ResourceBundles. And we’ll make the class a singleton, since we won’t need more than one of them.
private static Map<Locale, ResourceBundle> bundleMap = null;

    private static Messages instance = null;

    public static Messages getInstance() {
        if (instance == null) {
            instance = new Messages();
            instance.setLocales(new Locale[0]);
        }
        return instance;
    }

    public static Messages getInstance(Locale... locales) {
        if (instance == null) {
            instance = new Messages();
            instance.setLocales(locales);
        }
        return instance;
    }

    public void setLocales(Locale... locales) {
        bundleMap = new HashMap<Locale, ResourceBundle>();
        for (Locale locale : locales) {
            ResourceBundle bundle = ResourceBundle.getBundle(BUNDLE_NAME, locale);
            bundleMap.put(locale, bundle);
        }
    }
Notice how this time, we pass the Locale to getBundle(). The locale determines the final name of the properties file associated with that Locale: for Locale.GERMANY, the file name will end in messages_de_DE.properties; for Locale.FRANCE, the file name will end in messages_fr_FR.properties.
wilkommen.welcome=Wilkommen
wilkommen.stranger=Fremde
wilkommen.happy_to_see_you=Gluklich zu sehen
wilkommen.stay=Bleibe
wilkommen.to_cabaret=Im Cabaret
File messages_de_DE.properties
wilkommen.welcome=Bienvenue
wilkommen.stranger=Etranger
wilkommen.happy_to_see_you=Je suis enchante
wilkommen.stay=Reste
wilkommen.to_cabaret=Au Cabaret
File messages_fr_FR.properties
For Locale.US, the file name should end in messages_en_US.properties, but we haven’t defined such a file! What happens then? The ResourceBundle takes the properties file assigned to the base BUNDLE_NAME.
Now we’ll modify getString() to no longer be static, and to take the Locale into account when returning a String.
    public String getString(String key, Locale locale) {
        try {
            ResourceBundle bundle = bundleMap.get(locale);
            if (bundle == null) {
                return null;
            }
            return bundle.getString(key);
        } catch (MissingResourceException e) {
            return '!' + key + '!';
        }
    }
Now to modify Wilkommen to take advantage of these changes. For starters, the constants at the head of the class can’t call Messages.getString() any more.
private static final String WELCOME = "wilkommen.welcome";
private static final String STRANGER = "wilkommen.stranger";
private static final String HAPPY_TO_SEE_YOU = "wilkommen.happy_to_see_you";
private static final String STAY = "wilkommen.stay";
private static final String TO_CABARET = "wilkommen.to_cabaret";
Then we’ll establish an array of Locales and create a Messages object that provides a ResourceBundle for each of them.
    private static final Locale[] LOCALE_ARRAY //
            = { Locale.GERMANY, Locale.FRANCE, Locale.US };

    private static final Messages MESSAGE_PROVIDER = Messages.getInstance(LOCALE_ARRAY);
And we’ll change printPhrase to accept a key and cycle through the Locales.
private static void printPhrase(String key) {
    StringBuilder phrase = new StringBuilder();
    String prefix = "";
    for (Locale locale : LOCALE_ARRAY) {
        phrase.append(prefix + MESSAGE_PROVIDER.getString(key, locale));
        prefix = ", ";
    }
    System.out.println(phrase);
}
And now when we run we get:
Wilkommen, Bienvenue, Welcome
Fremde, Etranger, Stranger
Gluklich zu sehen, Je suis enchante, Happy to see you
Bleibe, Reste, Stay
Im Cabaret, Au Cabaret, To Cabaret
Internationalizing Dates, Times, and Numbers
Our old friends DateTimeFormatter, DateFormat (and its subclass SimpleDateFormat), and NumberFormat (and its subclass DecimalFormat), have facilities for internationalization as well.
For example, once you have a DateTimeFormatter, like, say, this:
DateTimeFormatter f = DateTimeFormatter.ISO_LOCAL_DATE;you can then create another DateTimeFormatter from it using the withLocale() method:
DateTimeFormatter italyDate = f.withLocale(Locale.ITALY);You can then use italyDate to format and parse Dates to and from Strings in the format used in Italy.
Likewise, you can assign a Locale to a NumberFormat or DateFormat at creation:
        NumberFormat integerFormat = NumberFormat.getIntegerInstance(Locale.CHINA);
        DateFormat dfmt = DateFormat.getDateInstance(DateFormat.LONG, new Locale(Locale.ITALIAN));
Substitutions: the MessageFormat Class
But one of the greatest facilities for internationalization is the MessageFormat class, which can take a pattern from a resource bundle and substitute variables in locale-specific formats.
MessageFormat can take a pattern and an array of values, and format the values within the pattern in the places and formats specified.
As an example, suppose our pattern, in English, is:
String pattern = "On {1,date,medium}, {2} was found to be {0,number,###,##0.00} " //
      + "miles from Earth.";
We can then produce a String in which the desired values are substituted in a format suitable for the United States.
MessageFormat fmt = new MessageFormat(pattern, Locale.US);
Float distance = 98,445.8;
java.sql.Date day = java.sql.Date.valueOf("1903-07-04");
String star = "Alpha Centauri";
Object[] arguments = { day, distance, star };
String message = fmt.format(arguments);
and the result would be:
On 04/07/1903, Alpha Centauri was found to be 98,445.80 miles from Earth.In the pattern specification, each expression within braces is replaced by the corresponding value from the array passed to format()–0 being the first–formatted as specified by the pattern expression.
If, however, we used Locale.ITALY above instead of Locale.US, the result would be localized to:
On 07/04/1903, Alpha Centauri was found to be 98 445,80 miles from Earth.Of course, for an Italian audience, we’d want the output to be in Italian, so we’d substitute Italian into our pattern:
String pattern = "Il {1,date,medium}, ha scoperto che {2} è {0,number,###,##0.00} milioni di dollari della Terra.";As a practical matter, each of these patterns would be stored in ResourceBundle properties files, like this (assuming a base name of “astronomy_messages”):
alpha.discovery=On {1,date,medium}, {2} was found to be {0,number,###,##0.00} miles from Earth.File astronomy_messages.properties
alpha.discovery=Il {1,date,medium}, ha scoperto che {2} è {0,number,###,##0.00} milioni di dollari della Terra.File astronomy_messages_it_IT.properties
Pattern specification
So how are the substitution expressions formatted?
First, each one is enclosed in braces, in one of these formats:
{ArgumentIndex}
{ArgumentIndex, FormatType}
{ArgumentIndex, FormatType, FormatStyle}
ArgumentIndex is the index of the corresponding value in the array passed to the format() method in the Java code. If nothing follows ArgumentIndex, the formatted value is the result of calling toString() on the source value.
For values other than Strings, you can specify a FormatType and, possibly, a FormatStyle (both case insensitive), which have the effects shown in this table.
As you can see from the pattern above ({0,number,###,##0.00}), a SubformatPattern is a pattern you would pass to SimpleDateFormat or DecimalFormat, without surrounding quotes, and possibly including commas that are not delimiters even though earlier commas are.
Exercise
And now you have enough information for our exercise. The ResourceBundle files for Lesson-24-Exercise-01 contain a pattern named building.data to format information about buildings, in German, French, and English. Likewise, class Buildings reads data from file buildings.txt and displays this information on the console for each of the three locales.
Your task is to modify the resource bundle properties files to format the building name, completion date, and cost, and to modify Buildings to use the resource bundles to display the formatted output on the console, preceded by the pertinent language which can be obtained from the Locale instance.
After running Buildings, the output should look like this:
German Das Gebäude Empire State Building wurde am 11.04.1931 zu einem Preis von 40.948.900,98 € fertiggestellt.
French Le bâtiment Empire State Building a été achevé le 11 avr. 1931 pour un coût de 40 948 900,98 €.
English The building Empire State Building was completed on Apr 11, 1931 at a cost of $40,948,900.98.

German Das Gebäude Chrysler Building wurde am 27.05.1930 zu einem Preis von 100.000,05 € fertiggestellt.
French Le bâtiment Chrysler Building a été achevé le 27 mai 1930 pour un coût de 100 000,05 €.
English The building Chrysler Building was completed on May 27, 1930 at a cost of $100,000.05.

German Das Gebäude CN Tower wurde am 30.09.1976 zu einem Preis von 63.000.000,60 € fertiggestellt.
French Le bâtiment CN Tower a été achevé le 30 sept. 1976 pour un coût de 63 000 000,60 €.
English The building CN Tower was completed on Sep 30, 1976 at a cost of $63,000,000.60.
If you get stuck, you can download a ZIP file containing a solution here. Good luck!
What You Need to Know
- Internationalization (a.k.a. i18n) uses the Locale class.
- Locales can be applied to date/time and number formatting classes like DateTimeFormat, SimpleDateFormat, and NumberFormat.
- A ResourceBundle is essentially a Properties instance read from a properties file whose name is dictated by the combination of a base file name and a Locale.
- ResourceBundles primarily provide locale-specific text.
- The MessageFormat class format() method uses a pattern and a Locale to format values passed to it appropriately for the specified Locale, according to formatting specifications embedded in the pattern.
Now let’s download a file from the Internet.
