In case you were wondering: of course you can send email from a Java application. All you need is:
- javax.mail.jar in the source and execution classpaths
- activation.jar in the execution classpath
- an email server
- something to say.
An Email Server
An email server is a computer application dedicated to sending and receiving emails. If you have an account with an email service like Outlook or Gmail, it should be possible to use that account to send emails. There is also server software that will let you run a server on your local machine.
However, these are all quite difficult to use. (If you’re ever in a Java shop that sends emails, the tech support staff will let you know how they interface with their server.) For this lesson, we’ll use a server simulator called fakeSMTP.
Click here to download fakeSMTP and learn how to use it.
Sending Your First Email
So let’s use fakeSMTP to “send” an email. Start by downloading the project in Lesson-19-Example-01.zip and importing it into your Eclipse workspace. Add javax.mail.jar and activation.jar to your build classpath, using the Project/Properties/Java Build Path command or by right-clicking the project. (Click here for a refresher on adding JARs to the build classpath.)
Next, open fakeSMTP. Use the instructions on their web site or, if you’re running Windows, right-click on the fakeSMTP JAR and select Open with/Java Platform binary. The fakeSMTP window will appear.
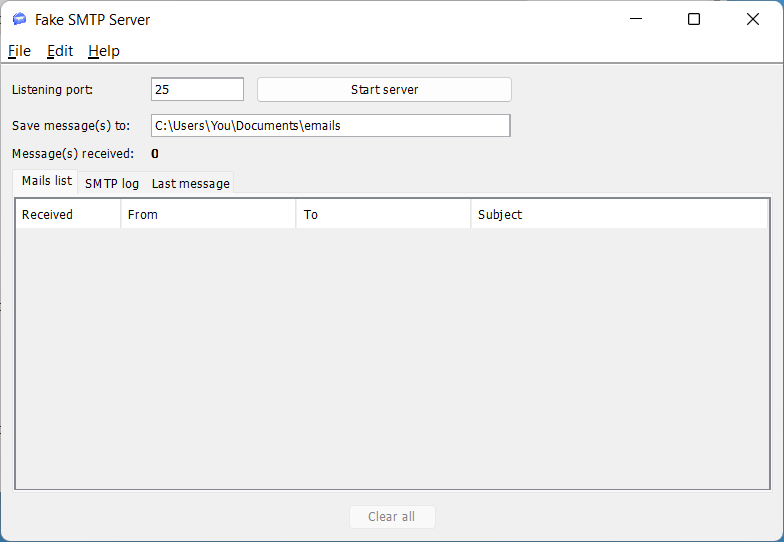
Click on the text box next to Save message(s) to: and, in the Open dialog, select or create a directory to hold your emails.
Then click the Start server button.
Finally, right-click on MrPostman.java and select Run As/Java Application. If all goes well, the console will display Email Sent Successfully! Return to fakeSMTP and see that your email now appears in the Mails List.
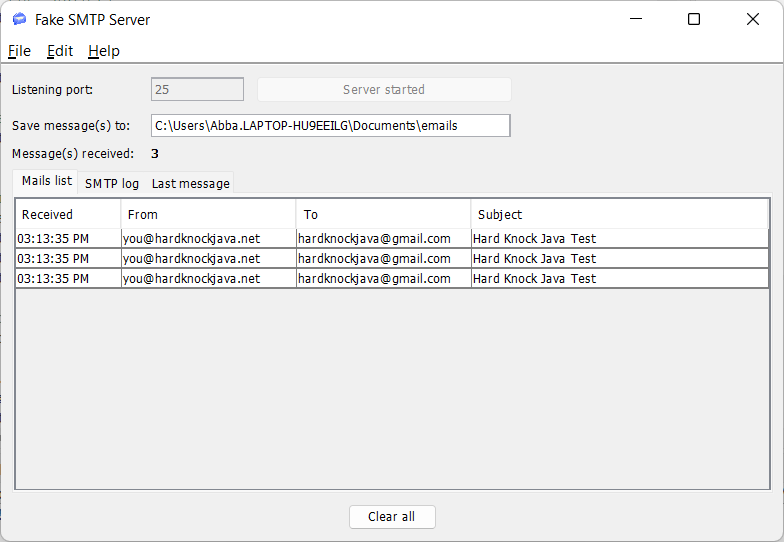
Double-click on the email listing and your email application will open your email.

Deep Dive
Now let’s look at the code that produced this email, in class MrPostman.
    String host = "localhost";
    String port = "25";

    String user = "you";
    String fromEmail = user + "@hardknockjava.net";
    String password = "mypassword";
    String toEmail = "hardknockjava@gmail.com";
These lines establish some property values. localhost is the name of your email server; it indicates your own computer. 25 is a common port number for sending emails in SMTP.
Since our “server” has no logon facility, the values of user and password are useless but are here for illustration. In a real-world application, you’d probably have to supply a valid user ID and password.
    // Get system properties
    Properties props = new Properties(System.getProperties());

    // Setup mail server properties
    props.setProperty("mail.smtp.host", host);
    props.setProperty("mail.smtp.port", port);
    props.setProperty("mail.transport.protocol", "smtp");
Here we’re setting properties for sending email in our system, plus adding system-level Properties as defaults.
    // Create an Authenticator that will provide the credentials
    // for access to the mail server.
    Authenticator auth = new Authenticator() {
        protected PasswordAuthentication
            getPasswordAuthentication() {
                 return new PasswordAuthentication(fromEmail,
                    password);
        }
    };
According to the Oracle documentation, Authenticator “represents an object that knows how to obtain authentication for a network connection.” When you call a service that needs a logon ID and password, you pass the Authenticator to it, and the service calls the getPasswordAuthentication() method which returns a PasswordAuthentication object. How it populates that is up to the developer; in this case, we just use our dummy user and password values.
    // Log on to the mail server named by the properties
    // and using the credentials.
    Session session = Session.getInstance(props, auth);
    session.setDebug(false);
Here we establish a session with the mail server. Notice how the Authenticator is being passed. The setDebug() call indicates whether the console will receive debugging information. Try setting it to true to see how the email process is going about its business.
    // This is our message. It's in HTML.
    String bodyText = "<style>table, tr, th, td {border: solid 1px}</style>" //
            + "\n <table>" //
            + "\n <thead style=\"border: solid 1px; background-color: yellow\" >" //
            + "\n   <tr>" //
            + "\n     <th>Company</th>" //
            + "\n     <th>Contact</th>" //
            + "\n     <th>Country</th>" //
            + "\n   </tr>" //
            + "\n </thead>" //
            + "\n   <tr>" //
            + "\n     <td>Alfreds Futterkiste</td>" //
            + "\n     <td>Maria Anders</td>" //
            + "\n     <td>Germany</td>" //
            + "\n   </tr>" //
            + "\n   <tr>" //
            + "\n     <td>Centro comercial Montezuma</td>" //
            + "\n     <td>Francisco Chang</td>" //
            + "\n     <td>Mexico</td>" //
            + "\n   </tr>" //
            + "\n </table>";
This is the text of our message. It happens to be in HTML. Notice how you can add a CSS style sheet to the message; email readers will honor this!
    // Call the sendMail() method.
    sendEmail(session, toEmail, fromEmail, "Hard Knock Java", "Hard Knock Java Test", bodyText);
In our example, “Hard Knock Java” is the name of our sender, and “Hard Knock Java Test” is our email subject line.
public static void sendEmail(Session session, String toEmail, String fromEmail, String fromName, String subject,
            String body) {
    try {
        MimeMessage msg = new MimeMessage(session);

        // Create our one and only recipient address.
        // fromName is the name you see that identifies the
        // sender in the "from" line of an email.
        Address fromAddress = new InternetAddress(fromEmail, fromName);

        // Establish the sender's address and name.
        msg.setFrom(fromAddress);

        // setReplyTo requires an array of Addresses.
        // InternetAddress.parse() converts and single Address
        // into an array.
        msg.setReplyTo(InternetAddress.parse(fromEmail, false));

        // Set the subject.
        msg.setSubject(subject);

        // Set the message body and indicate that it's HTML.
        msg.setContent(body, "text/html");

        // Establish the send date.
        msg.setSentDate(new Date());

        // Set To, CC, and BCC recipients to the same email
        // address. The latter two are for illustration purposes.
        Address[] toAddresses = InternetAddress.parse(toEmail);
        msg.setRecipients(Message.RecipientType.TO, toAddresses);
        msg.setRecipients(Message.RecipientType.CC, toAddresses);
        msg.setRecipients(Message.RecipientType.BCC, toAddresses);

        // Send the message.
        Transport.send(msg);

        System.out.println("EMail Sent Successfully!!");
    } catch (Exception e) {
        e.printStackTrace();
    }
}
Our sendMail() method creates a MimeMessage and passes it to Transport, whose send() method send the message.
The comments make this code pretty self-explanatory, but let’s take note of a few points.
- The Address class provides a single email address with, optionally, a text name. You’ll often see that text name in emails you receive; this is where it comes from.
- There can be multiple reply-tos, TO recipients, CC recipients, and BCC recipients for our message, so the methods that set these values accept arrays of addresses. The InternetAddress.parse() method accepts a comma-delimited set of email addresses, ensures they’re in valid format, and returns them in an array of InternetAddress objects. InternetAddress is a subclass of Address.
- The second argument in the line msg.setContent(body, “text/html”) is a MIME type, which indicates the format of the content. In this case the body text is HTML. If the message were plain text, we’d code “text/plain”.
Sending a File With an Attachment
Now try running MrPostmanAttachment. When you open this email in fakeSMTP, you’ll notice there’s an Excel file attached to it.
Deep Dive
Let’s look at the changes to the sendMail() method that allow addition of an attachment.
public static void sendEmail(Session session, String toEmail, String fromEmail, String fromName, String subject,
        String body, File attachment) {
    ...
        // This message has multiple parts: one for the body text,
        // and one for the attachment. Each is of the type
        // MimeBodyPart.
        MimeBodyPart textPart = new MimeBodyPart();
        textPart.setContent(body, "text/html");

        // Create a MimeMultipart and add textPart to it.
        MimeMultipart multiPart = new MimeMultipart();
        multiPart.addBodyPart(textPart);
This message has two parts: one for the body text, and one for the attachment. Here we create a MimeBodyPart for the text and add it to the end of a MimeMultipart, which will ultimately become the content of the MimeMessage instead of mere text.
Now for the second part: the attachment.
        // If we're successfully passing an attachment file,
        // create a MimeBodyPart for it and add that to multiPart.
        if (attachment != null) {
            // Create a MimeBodyPart for the attachment and
            // attach the attachment.
            MimeBodyPart attachmentPart = new MimeBodyPart();
            attachmentPart.attachFile(attachment);

            // Add the MimeBodyPart for the attachment to the
            // multipart message.
            multiPart.addBodyPart(attachmentPart);
}And finally, we can send our multipart message:
        // Set the MimeMessage's content to the multipart
        // message, and send the message.
        msg.setContent(multiPart);
        Transport.send(msg);
When we were sending only text, msg.setContent() accepted a String. Now, when we’re sending a multipart message, msg.setContent() takes a MimeMultipart instance, which contains multiple MimeBodyPart instances.
And that’s enough to let you send email in Java.
What You Need to Know
- Sending emails in Java requires javax.mail.jar in the build classpath, plus activaton.jar in the execution classpath.
- It’s possible to send plain text, HTML, or other formats in the message body.
- Attachments are sent using multiple body parts.
Next: Processing XML