Writing a PDF is a whole different ball game from using Java graphics and print services. For one thing, there’s really no physical limit on the size of a page–although you’d be foolish not to divide your output into paper-size chunks. You’ll never need to worry about producing pages multiple times or out of sequence. And there’s no print system that calls your code when it’s ready; creating a PDF is closer to writing a file.
So let’s get started.
    private float margin = 72;

    private static final float IMAGE_WIDTH_IN_POINTS = 108;

    public static void main(String[] args) throws Exception {
        GettysburgAddress address = new GettysburgAddress();
        GettysburgPdfWriter printer = new GettysburgPdfWriter(address);
        printer.printAddress();
        System.out.println("Done");
    }

    public GettysburgPdfWriter(GettysburgAddress address) {
        this.address = address;
    }

    public void printAddress() throws Exception {
        PDDocument doc = new PDDocument();
        printAddress(doc);

        Date today = new Date();
        SimpleDateFormat format = new SimpleDateFormat("yyyyMMdd-HH24mmss");
        String fileName = "address-" + format.format(today) + ".pdf";
        File addressDir = new File("pdf");
        addressDir.mkdirs();
        File addressFile = new File(addressDir, fileName);
        addressFile.delete();
        doc.save(addressFile);
        doc.close();
    }
Our main method, printAddress(), starts by creating a PDDocument and passing it to our printAddress() method. After that, it makes sure directory pdf exists inside our project in the Eclipse workspace, creates a File whose name includes a timestamp, and calls save() on our document to write it to disk, and finally calls close() on the document.
So far, so good. On to the work of populating the document.
Creating Pages With PdfBox
Our printAddress() method creates pages in our document and calls other methods to populate them.
    private void printAddress(PDDocument doc) throws Exception {
        PDPage page1 = new PDPage();
        doc.addPage(page1);
        PDPageContentStream contentStream1 = new PDPageContentStream(doc, page1);
        try {
            printPage1(doc, page1, contentStream1);
        } finally {
            contentStream1.close();
        }

        PDPage page2 = new PDPage();
        doc.addPage(page2);
        PDPageContentStream contentStream2 = new PDPageContentStream(doc, page2);
        try {
            printPage2(doc, page2, contentStream2);
        } finally {
            contentStream2.close();
        }
    }
For each of the pages, we create a new PDPage object and add it to the PDDocument, doc. Then we create a PDPageContentStream, indicating which PDDocument and PDPage it belongs to. And then we pass all three to method printPage1() or printPage2().
PDPageContentStream corresponds to a Graphics object. It’s where the drawing gets done.
So much for the high-level view. Now let’s get into nuts and bolts of adding text and images to page 1.
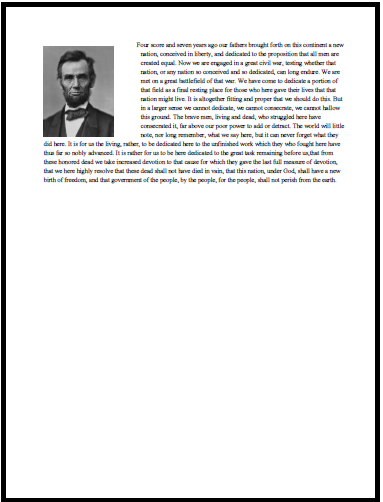
Page 1
    private void printPage1(PDDocument doc, PDPage page, PDPageContentStream stream) throws Exception {
        // Add the photograph to the page. Scale it so
        // its width is IMAGE_WIDTH.
        float heightToWidth = ((float) address.getImage().getHeight(null))
                / ((float) (address.getImage().getWidth(null)));
        float targetImageHeight = IMAGE_WIDTH_IN_POINTS * heightToWidth;
        ByteArrayOutputStream os = new ByteArrayOutputStream();
        ImageIO.write(address.getImage(), "jpg", os);
        byte[] imageArray = os.toByteArray();
        PDImageXObject pdImage = PDImageXObject.createFromByteArray(doc, imageArray, "lincoln");

        // The starting y coordinate is the height of the print
        // area less originY.
        PDRectangle box = page.getMediaBox();
        float imageOriginY = (box.getHeight() - margin - targetImageHeight);
        stream.drawImage(pdImage, margin, imageOriginY, IMAGE_WIDTH_IN_POINTS, targetImageHeight);
We start page 1 in a fashion similar to the way we did it with Graphics. But note that we can’t add a BufferedImage directly to our PDF; instead, we write it to a ByteArrayOutputStream and read it back into a PDIMageXObject.
Next comes the matter of how to place the image with stream.drawImage(), whose third argument is where the bottom of the image goes. For this we need to know the height of our “page.”
Unlike in Graphics, where a y-coordinate of zero is the top, in PdfBox the x and y coordinates relate to the upper right quadrant of a Cartesian coordinate system; in other words, as x increases, a point is further to the right (just as with Graphics), but as y increases, a point is further up (the opposite of Graphics). It won’t do to start the image at point (0, 0)–that’s the bottom of the page. No, the y-coordinate passed to drawImage() must be calculated as: the height of the page (say, 720 points for 10 inches of print) less the margin (20 points) less the height of the image (whatever that may be); remember, the lower the value, the lower on the page.
For its part, drawImage() scales the image, just as with Graphics.
        // Compute where the first line of text will begin horizontally.
        float fontSize = 14F;

        float lineHeight = fontSize + 2;
        float x = margin + IMAGE_WIDTH_IN_POINTS + 6;
        float y = imageOriginY + targetImageHeight - lineHeight;
We’ve chosen a font size of 14 points. Given that, we’ll space 16 points between lines of text.
We want the first line of text to begin at a point starting at the margin plus the width of the image (which starts at the left margin) plus a cushion of 6 points. That was easy.
For the y coordinate–well, it’s a good thing we saved where the image bottom is; and from there we go up by the image height but down by our line height; since text is positioned by baseline, just as with Graphics, we want to leave room above the baseline so the first line of text ends at this position.
        PDFont font = new PDType1Font(Standard14Fonts.FontName.TIMES_ROMAN);
        stream.setFont(font, fontSize);
        stream.setLeading(lineHeight);
Now we’re picking our text font. There is a set of constants in class Standard14Fonts.FontName corresponding to fonts and styles which are always available with PdfBox:
    TIMES_ROMAN
    TIMES_BOLD
    TIMES_ITALIC
    TIMES_BOLD_ITALIC
    HELVETICA
    HELVETICA_BOLD
    HELVETICA_OBLIQUE
    HELVETICA_BOLD_OBLIQUE
    COURIER
    COURIER_BOLD
    COURIER_OBLIQUE
    COURIER_BOLD_OBLIQUE
    SYMBOL
    ZAPF_DINGBATS
… although it’s also possible to choose a font from your system or to load a font file and use that.
After adding the font and its size to our PDPageContentStream, we set the leading (pronounced “LEDD-ing”), which is the printer’s term for the distance between lines. If we don’t, PdfBox will assume there isn’t any.
        // Get the words of the text and convert the array to a List.
        String[] words = address.getWords();
        List<String> wordList = new ArrayList<String>(Arrays.asList(words));

        // As long as there are words in the list, build a buffer
        // until adding the next word would exceed the current
        // line. Then print the buffer as is, determine the next
        // y and x, and restart.
        StringBuilder buf = new StringBuilder();
        double textLimit = box.getWidth() - x - margin;
And here we’re creating our word list, staring a StringBuilder, and calculating how much space is available on our print line, much as before. The only difference is where the total page width comes from.
And how our text drawing loop:
        stream.beginText();
        stream.newLineAtOffset(x, y + lineHeight);
        while (!wordList.isEmpty()) {
            String nextWord = wordList.remove(0);
            if (textWidth(buf.toString() + " " + nextWord, font, fontSize) > textLimit) {
                stream.newLine();
                stream.showText(buf.toString());
                buf = new StringBuilder();
<snip>
        // Start a new line and write the buffer.
        stream.newLine();
        stream.showText(buf.toString());
        stream.endText();
Computing text width with PdfBox isn’t as simple as with Graphics. Here’s the textWidth() method called above:
    private float textWidth(String text, PDFont font, float fontSize) throws Exception {
        return font.getStringWidth(text.toString()) / 1000 * fontSize;
    }
The first thing is to tell PdfBox that we’re about to start writing text by calling beginText(). Eventually, we’ll call endText() to signal that we’re done writing text, at least for the moment.
This is a hard and fast rule when it comes to drawing on the content stream. You can only call text methods–and you can call only text methods–between beginText() and endText(). This includes calls to showText(), newLine(), and newLineAtOffset(). Conversely, you can only call non-text methods–and you can call only non-text methods–before beginText() or after endText(). This includes addRect(), drawImage(), fillAndStroke(), and more.
beginText() sets the current text position at (0, 0)–i.e., the bottom left of the page. Calling newLineAtOffset() moves the position relative to where it was by the values in the arguments. Moving from (0, 0) to (x, y + lineHeight) effectively moves the current position to that spot.
The call to newLine() moves the text position back to the horizontal position from the last newLineAtOffset() call and down one line; this is where leading comes in.
Finally, showText() draws the string to the page.
But what about that <snip>? Here’s the mechanics of adjusting the horizontal and vertical positions before each new line.
            if (textWidth(buf.toString() + " " + nextWord, font, fontSize) > textLimit) {
                stream.newLine();
                stream.showText(buf.toString());
                buf = new StringBuilder();
                y -= lineHeight;
                float newX;

                // Determine what the new x value should be. If y is still within
                // the height of the image, x remains to the right of the image.
                // Otherwise, x is now at the left margin.
                if (y < (imageOriginY - lineHeight)) {
                    newX = margin;
                } else {
                    newX = margin + IMAGE_WIDTH_IN_POINTS + 6;
                }

                // If the new x differs from the old one, end the text
                // and restart at the left margin, and one line up the
                // page because the next newLine will otherwise leave
                // a gap.
                if (newX != x) {
                    stream.endText();
                    stream.beginText();
                    stream.newLineAtOffset(newX, y + lineHeight);
                    x = newX;
                }
                textLimit = box.getWidth() - x - margin;
            }
            buf.append(nextWord + " ");
Notice that after drawing a line of text, we decrement the y coordinate by lineHeight–which, you’ll recall, is our leading value. Then we can determine newX, the next horizontal position: if y has dropped below the bottom of the image, we’ll start at the margin; otherwise, we’ll start to the right of the image.
Now, if x and newX are the same, we do nothing; the next line will move down thanks to the newLine() call just before displaying the next line of text. But what if they’re different?
- We call endText() to close off the current stream of text.
- We call beginText() again to reset the position to (0, 0).
- We call newLineAtOffset() to position at the left margin and at the same position as the previous line. We set the position one line above where we intend to print because the newLine() call will drop the position to where the first long line of text will go before showText() is called.
And finally…
        // Start a new line and write the buffer.
        stream.newLine();
        stream.showText(buf.toString());
        stream.endText();
And once again, our first page looks like this:
You may have noticed that we call beginText() instead of newLineAtOffset() to change our position. That’s because of two things. First, the repositioning done by newLineAtOffser() is relative to where the previously drawn text leaves off. And second, there’s no way of knowing where that is.
Page 2
As in our last example, we’ll draw a couple of geometric shapes.
    private void printPage2(PDDocument doc, PDPage page, PDPageContentStream stream) throws Exception {
        PDRectangle box = page.getMediaBox();
        float x = box.getLowerLeftX() + 72;
        float y = box.getUpperRightY() - 72;

        // Draw a 1-inch blue line.
        stream.setStrokingColor(Color.BLUE);
        stream.moveTo(x, y);
        stream.lineTo(x + 72, y);
        stream.stroke();

        // Draw a 2-inch square with a red border and yellow fill.
        y = y - 72;
        stream.setStrokingColor(Color.RED);
        stream.setNonStrokingColor(Color.YELLOW);
        stream.addRect(x, y - 144, 144, 144);
        stream.fillAndStroke();
        stream.close();
    }
Notice how we call getMediaBox() again to find the dimensions of the page.
Next we’ll draw a line. We call setStrokingColor() to choose a color, moveTo() to position the start of the line, lineTo() to draw it to extend from that position to its endpoint, and stroke() to “commit” the line. stroke() completes the drawing of the outline of any figure we’ve drawn to this point.
Having called stroke(), we can now choose a new color, and we do. Then we’ll call setNonStrokingColor() which determines the color of the fill (i.e., the inside) of geometric figures. addRect() draws a rectangle, and fillAndStroke() puts both the outline and the fill “to paper.”
Remember: stroke() draws the outlines of any shapes that haven’t yet been drawn. fill() draws the interior of any shapes that haven’t yet been drawn. fillAndStroke() does both.
And here’s the result:
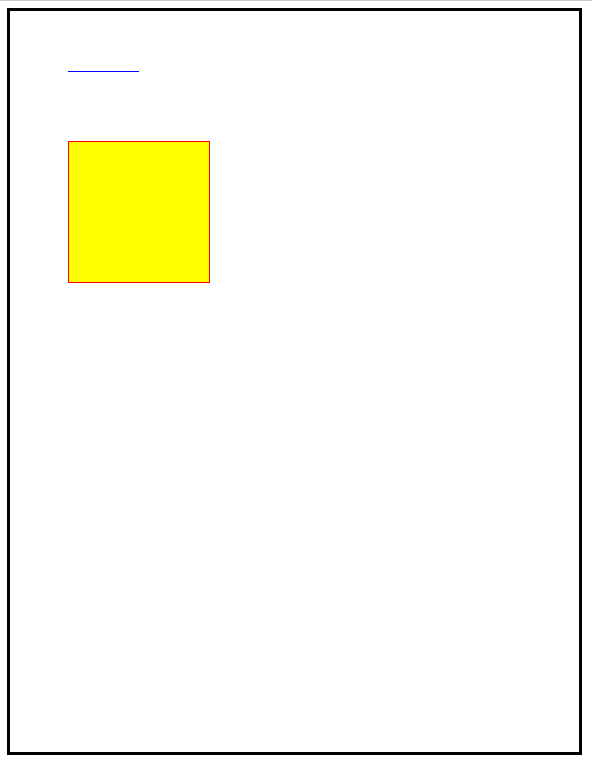
You may have noticed that unlike our Graphics example, we haven’t tried to draw a circle with PdfBox. This is because drawing ovals, and by extension circles, is a royal pain in the butt, involving drawing a series of Bezier curves instead. If you ever need to draw a circle, you can find examples online. But for now we’re going to let it go.
What You Need to Know
- Java print services let you use the Graphics class to format pages for printing.
- You work with Java print services by creating a class that implements the Printable interface.
- PdfBox is a software solution from the Apache Software Project to create PDFs.
Fasten your seat belts. It’s time for the Final Challenge.